
Amassing an impressive spirits collection is only half of the battle when it comes to assembling a first-rate home bar — there’s also glassware, bar tools, and even ice to consider. But to really take things to the next level, a few simple cocktail projects go a long way.
From batching citrus for the long haul to delicious (and simple) infusions, these five projects are an easy way to elevate your home bar.
Basic
Citrus Juice Ice Cubes
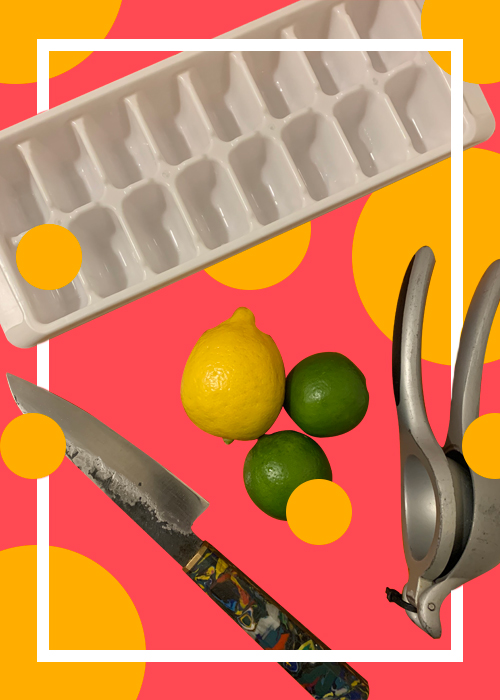
Using freshly squeezed citrus juice is imperative for mixing quality cocktails, but squeezing lemons or limes each time you prepare a Sidecar or Daiquiri is both messy and tedious. At cocktail bars, the professionals squeeze a batch of juice before each shift, ensuring they have enough mise en place (prepared ingredients) to get them through the night. This kind of preparation can easily be recreated at home, but knowing exactly how much juice to squeeze is another consideration.
If you’re taking the time to batch citrus juice, you’ll want to make it worth the effort, and therefore juice a decent amount of fruit. The only problem is this: Fresh juice goes bad after two or three days, and the countdown begins as soon as you’ve squeezed it.
In order to put that clock on hold, consider freezing the freshly squeezed juice in ice cube trays. Not only does this maintain the fresh juice for much longer (up to three months), it offers the opportunity to pre-portion the juice in ¾- or 1-ounce cubes — perfect for cocktails.
Peel the citrus prior to juicing, as this ingredient can be used for another project (listed later). And once the cubes have frozen solid (overnight should be enough time), remove them from the tray and place them in a sealed container or Ziploc bag. Otherwise, they’ll start taking on the flavor of anything else in your freezer, and no one wants a burrito-infused Daiquiri.
As a rough guide, ripe limes yield 1 ounce of juice, while large lemons produce 1½ to 2 ounces. – Tim McKirdy, staff writer
Oleo-Saccharum (Citrus Syrup)
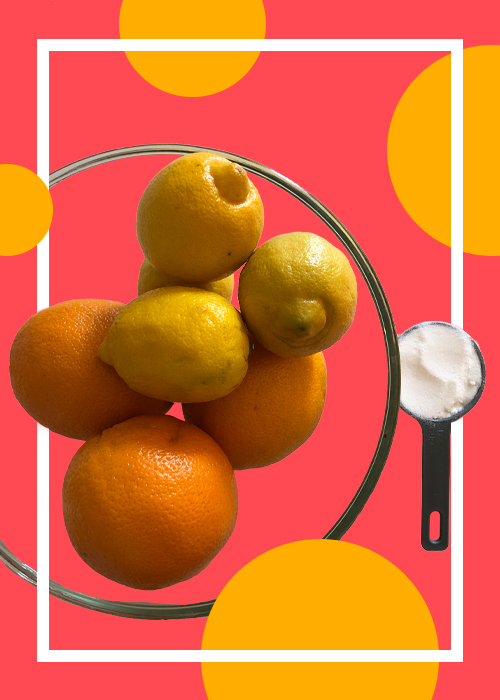
Though its name is a mouthful, oleo-saccharum (Latin for “oil-sugar”) is simple in concept and preparation — it’s a syrup made from steeping citrus peels in sugar. Basic enough, but the result is magical. The sugar extracts the “ambrosial essence” of citrus, capturing its fragrance and depth like no other technique, according to David Wondrich in “Punch: The Delights and Dangers of the Flowing Bowl.” In fact, oleo-saccharum is the ingredient that “marks the difference between a good punch and a great one,” Wondrich writes, noting that the technique has been used in punches since at least the early 1700s.
Beyond punches, oleo-saccharum enlivens just about any cocktail with its lifted citrus perfume and bright, intense flavor. You can make the syrup from lemons, oranges, and grapefruits, or a mix of citruses. However, according to Wondrich, limes are rarely used, as their oils tend to be bitter.
To make it, start by peeling about 1 cup’s worth of citrus fruit using a vegetable peeler, trying not to get the white pith (which is bitter). Place the peels in a medium mixing bowl. Add 1/2 cup white sugar to the bowl. Muddle the sugar and peels for a few minutes, then let the mixture steep for at least three hours, stirring occasionally. You can leave the mixture to sit for up to a day, with the syrup getting more intensely flavored over time. Next, strain the syrup into an airtight container and refrigerate until use. It will keep for up to a week. The leftover candied peels can be used as cocktail garnishes.
Oleo-saccharum shines in spirit-forward cocktails like Old Fashioneds, but also punches up a French 75 or a Sidecar. My favorite way to use it is in an aged rum Old Fashioned. In a mixing glass, I add 1 teaspoon of oleo-saccharum, 2 ounces of El Dorado 12 Year Old rum, 2 dashes of Angostura bitters, and ice. Stir for 15 seconds, and strain into an Old Fashioned glass with a large ice cube. Use one of the candied citrus peels for garnish. – Erica Duecy, chief content officer and editor in chief
Intermediate
Clear Ice
Ice impacts the temperature, flavor, and aesthetics of any drink served on the rocks. Needless to say, it’s a very important ingredient. The easiest way to upgrade the ice in your drink is by creating large, clear blocks, which dissolve slower than normal cubes and are much more visually appealing.
The cloudy mass inside normal ice is air, which is forced into the center of the cube as the water freezes. The air is pushed into the center because the cube is being frozen from all sides at an equal rate. To stop this happening, and create clear ice, you need to slow down the rate of freezing on all but one side of the cube.
For this, you will need a small cooler that will fit inside your freezer, and later down the line you’ll also need a cutting board, some clean dish towels, a serrated knife, and a clean hammer.
Start by filling the cooler with room-temperature water and place it inside the freezer without the lid. (Filtered water is preferred for flavor purposes, but not strictly necessary.) The insulated sides of the box ensure the ice freezes from the surface downward, with all air pushed toward the base of the container.
Remove the cooler from the freezer after 24 hours and leave it on the countertop for five minutes before attempting to pry the ice from the box. In the meantime, set up your cutting board, lined with a clean dish towel, over or next to your kitchen sink, as the process is about to get slightly messy.
After the five minutes are up, overturn the cooler onto the towel and chopping board. The block should release easily (along with some water) and won’t be completely frozen itself. The (now) top section of the ice, which contains the water and air, will only be part frozen. Remove this by lightly tapping with the hammer, leaving a solid, clear rectangle of shimmering ice, which is ready to be portioned into cubes.
Using your standard rocks or Highball glass as a guide (depending on the type of drink you’re preparing the ice for), measure the desired width of your cubes. Start slowly cutting into the ice with the serrated knife and when the cut is a few millimeters deep, hold your knife firmly and tap down on it with the hammer. A few confident knocks will release a clean rectangle of ice, which can be broken down into smaller pieces using the same technique.
When you’ve cut all the ice, return the cubes to the freezer and store in a sealed container or Ziploc bag(s). – Tim McKirdy, staff writer
Bathtub Gin
Let me clear one thing up from the beginning: Bathtub gin isn’t really gin, so if you’re one of these purists — I know… we all know. But it is still delicious, and a fun project to make at home.
All you need is a large Mason jar, a bottle of vodka or grain spirit — such as Everclear — and then a bunch of botanicals. I like to use lemon peels, cucumber, dill, and juniper berries, because it wouldn’t really taste like gin without them. But you can use whatever you prefer; maybe a bit of tea, some other citrus peel — grapefruit would be nice — anise, peppercorns, etc. Feel free to be creative.
Then, just stir it all together and let it sit for about two weeks at room temperature or in the fridge — either works. Give it a stir or shake every few days. Taste it often and when it tastes good to you, strain the liquid into a bottle and you have your own bathtub gin, perfect for cocktails! – Adam Teeter, chief executive officer and co-founder
Bathtub Gin Recipe
Ingredients
- 750 milliliter bottle vodka
- Zest of 4 lemons
- 2 Persian cucumbers sliced into rounds
- A handful of juniper berries
- 1 bunch dill
Directions
- Combine all ingredients in a Mason jar.
- Let sit for two weeks, stirring every other day.
- Strain the liquid from solids into a bottle or decanter.
Advanced
Pickled Onions
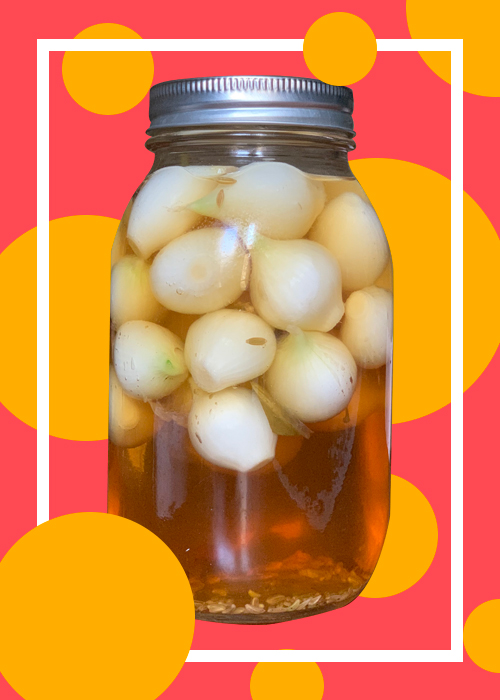
A particularly hearty variation of the Martini, the Gibson adds a pickled onion into the cocktail’s classic mix of gin and dry vermouth. With just three components, each needs to be of the highest quality to do the drink justice.
Most Martini drinkers likely have their prepared gin and vermouth combo, but when it comes to the cocktail onion, it’s all too easy to pick up whatever’s lurking on the shelf at the local grocery store and call it a day. This is a mistake. Homemade cocktail onions add a truly personal touch to your Gibson, and making them is a really simple process with results that are infinitely better than store-bought alternatives.
Using fresh onions, rather than pre-peeled frozen ones, is important. Not only are they generally much larger, they maintain their shape and crunch better throughout the process. (They’re tricky to peel, but there’s a really simple way to overcome this, listed below.)
Making the brine with a high-quality vinegar is also essential. And given that the pickling liquid can be reused multiple times, it’s not as expensive as it might first seem. This recipe also includes vermouth, where other pickling liquids may instead use white wine. The ultimate destination for these onions, after all, is a Gibson Martini. – Tim McKirdy, staff writer
Pickled Onions Recipe
Ingredients
- 1 pound pearl onions
- 500 milliliters Chardonnay vinegar
- 100 milliliters dry vermouth
- 3 small bay leaves
- 4 black peppercorns
- 2 cloves
- 1 teaspoon fennel seeds (toasted)
- 3 tablespoons sugar
- 1 ½ teaspoons salt
Directions
- To peel the pearl onions, first bring a large pot of water to a boil. While you wait, remove the tips of the onion roots and prepare an ice bath by combining cold water with ice in a medium mixing bowl.
- When the water boils, add the onions and cook for 30 to 45 seconds. Remove with a slotted spoon and add directly to the ice bath. When the onions have completely cooled (a few minutes), discard the water.
- You should be able to easily peel the onions by pinching them from the top and squeezing out the heart of the vegetable. Try not to lose any more than one or two layers of skin.
- For the pickling liquid, combine the remaining ingredients in a medium saucepan and bring to a boil. While the ingredients warm, add the peeled onions to a sterilized Mason jar.
- When the liquid starts boiling, remove from the heat and pour over the cocktail onions. Cover and store at room temperature for two to three days before opening. Keep refrigerated after opening.